Rabu, 11 November 2020

Belajar libreoffice writer (membuat penomoran halaman skripsi)

Assalamualaikum wr.wb

     Dari pengalaman saya menulis tugas akhir dengan Libreoffice kesulitan nya awal adalah membuat penomoran untuk halaman di tugas akhir saya. Mencari-cari untuk membuat penomoran dengan format berbeda tapi masih saya kesulitan untuk mengimplementasikan nya.

Anda sekarang buka libreoffice dan pilih style > page

Screenshot_2018-05-06_07-43-57.png

    Di bagian page ini anda buat 2 nama pemformatan berbeda, Halaman BAB dan Halaman ISI. kemudian Halaman Bab ini adalah halaman yang nanti nya penomoran akan ada di bawah, dan Halaman ISI nanti nya penomoran akan ada di pojok atas.

Screenshot_2018-05-06_08-09-50.png

Maka akan muncul kotak dialog

Screenshot_2018-05-06_08-12-37

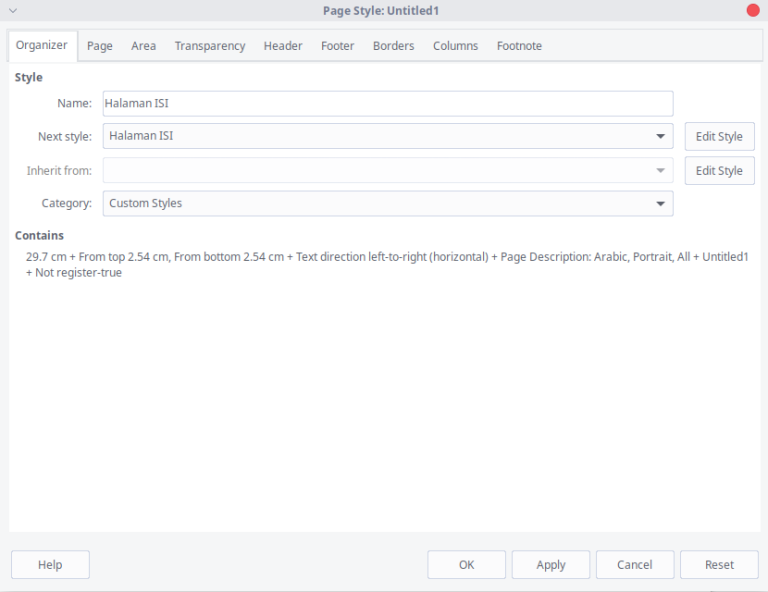
Name nya anda isi dengan Halaman ISI lalu pilih bagian header nya dan ceklis di bagian header. Lalu ceklis di bagian Header on

Screenshot_2018-05-06_08-16-05.png

Lalu tekan OK. Kemudian anda buat pemformatan baru lagi dengan nama Halaman BAB, untuk Next stle anda isi dengan Halaman ISI.

Screenshot_2018-05-06_08-19-06.png

Kemudian anda pilih menu footer dan ceklis Footer on

Screenshot_2018-05-05_11-40-42.png

Jika sudah selesai anda klik OK, dan anda mempunyai 2 format page yang sudah dibuat. Buat 2 halaman yang pertama tuliskan halaman BAB dan halaman ke 2 tuliskan halaman isi. Lalu Klik 2x di format Halaman BAB di halaman 1, dan Klik 2x di format Halaman ISI di halaman ke 2.

Screenshot_2018-05-06_08-32-32.png

Screenshot_2018-05-06_08-35-10

Kemudian anda klik di bagian footer di bagian halaman BAB

Screenshot_2018-05-06_08-36-34.png

Lalu Klik Insert > Field > Page Number maka akan muncul angka pada footer pada Halaman BAB. Lalu lakukan hal yang sama pada bagian header pada Halaman ISI. Nanti jadi nya akan seperti ini

Screenshot_2018-05-06_08-46-54.png

Nah sudah selesai untuk membuat penomoran dengan format skripsi dengan halaman yang berbeda. Sampai sini ada yang tidak paham dengan tutorial yang saya buat, silahkan tinggalkan komentar atau anda bisa hubungi secara langsung ke email atau telegram.

Jika anda tidak ingin ribet anda bisa download file yang sudah saya buat di link berikut. Download Halaman-BAB.odt Sekian tulisan dari saya semoga bermangfaat.

Wasalamualaikum wr.wb

Senin, 28 September 2020


Solving the 5x5x5 (Professor) Cube

These instructions can be used to solve a 5x5x5 cube, also known as the professor cube due to its difficulty. These directions are a graphical version of those given by Jacob Davenport.

Steps

  • 1. Solve the top points and crosses
  • 2. Solve the bottom points
  • 3. Solve the remaining points (on the sides)
  • 4. Complete the top and bottom crosses
  • 5. Complete the remaining crosses (on the sides)
  • 6. Associate wings with their appropriate edge pieces
  • 7. Solve the 3x3x3

Legend: Key to Symbols for the Moves

Key Cube

The figures in this document represent a sample cube. Although the colors on your personal cube may be different than the figures, I feel that the colored figures will still be helpful in solving the cube. I would suggest matching as many colors on your cube as possible to the figures, then making mental notes about which colors correspond between your cube The diagrams show all six sides of the cube by pretending that mirrors are being held up so that you may see the "hidden" sides.

The directions for what parts of the cube to turn and when are given in a code that is relative to the current positioning of the cube. Each side descriptor refers to a side with respect to the figure the move is referenced to. This means that the front side can be a different color, depending on the diagram being used. See Move 1 of the 3x3x3 Rubik's Cube page for instructive diagrams to illustrate the moves.

The Letters:

The side descriptors are:

  • U for the top (Upper) side,
  • u for the 2nd layer down from the top (just below the upper side),
  • L for the left hand side
  • l for the 2nd layer in from the left hand side
  • F for the front side
  • f for the 2nd layer in from the front side
  • B for the back side
  • R for the right hand side
  • r for the 2nd layer in from the right hand side
  • D for the down (bottom) side
  • d for the 2nd layer up from the down (bottom) side, and
  • H for the horizontal center slice (between u and d).

The Numbers:

Since the lower case L: l looks like the number 1, a letter by itself means to turn the side clockwise one quarter turn. A letter with a 2 following it means to turn the side two turns (halfway around). A letter with an apostrophe (') means to turn the side counterclockwise one quarter turn (a -1 can be used in place of an apostrophe, but the apostrophe takes up less space).

  • For example, U F2f2 D' Ll means to rotate the upper side clockwise one quarter turn, the front side and 2nd layer in from the front side clockwise twice (half way around), the down (bottom) side counterclockwise one quarter turn, and the left side and second layer in from the left side clockwise one quarter turn. Look directly at the specified side indicated to determine which direction is clockwise or counterclockwise.
  • For the central horizontal slice H, look at the cube through the top side to determine the clockwise direction.

The Pieces (see the Key cube above):

  • The piece in the center of each side is the center piece
  • Next to each center is a "cross" piece since the cross pieces form a cross or + with the center piece
  • Diagonally from each center piece are four "point" pieces
  • Each side of the cube has five pieces along it: Corner, Wing, Edge, Wing, Corner

In the figures, any gray pieces represent pieces that don't matter and can be any color. To increase clarity, I have shown a lot of colored pieces. In most cases, the figures represent an example of the situation being described, while the colors don't have to match perfectly.


Step 1: Solve the top points and crosses

Figure 1

Pick a center piece to represent the first side of the cube solved (blue in these figures) and solve the points and crosses on that side. One cross may be left empty since it will be used as the "keyhole" later on.

Step 2: Solve the bottom points

Get the four green points on the down (bottom) face in place, using Move 2a and Move 2b as necessary.

2a. To move two points into position:

Figure 2a

Orient the cube as shown in Figure 2a, where the two points to be moved into place are on the right side of the front face while any green points already on the down face are on the right side of the down face, then perform Move 2a.

You will need to rotate the front side and middle horizontal slice as necessary to place pieces into position.

Move 2a:

R'r' D2 Rr

In words, rotate the Right side and 2nd layer in from the right side counterclockwise one turn, the down (bottom)side two turns (180 degrees) and the right side and 2nd layer in from the right side clockwise one quarter turn.

2b. To move 1 point into position:

Figure 2b 

Orient the cube as shown in Figure 2b, where the one point to be moved into place is on the right side of the front face while any green points already on the down face are on the right side of the down face, then perform Move 2b.

You will need to rotate the front side and middle horizontal slice as necessary to place pieces into position.

Move 2b:

R'r' D Rr

Step 3: Solve the remaining 16 points (on the sides)

  • Solve the remaining 16 points on the four sides. Accomplish this using Dd moves (bottom two layers) along with F (front side) moves.

First, position the top 8 points along the 4 sides:

Figure 3 
Rotate Dd freely to get Points next to their centers, then F to put the points up to the upper layers, yielding Figure 3. Now use Moves 3a and 3b as needed.

3a. If the upper layer already has correctly placed points:

Figure 3a 

Move 3a:

L2 D'd' L2 Dd


3b. If a face has 3 solved points:

Figure 3b 

Move 3b:

Dd F D'd'


Step 4: Complete the top and bottom crosses

  • Complete the Blue and Green crosses. Pretend the cube is a 3x3x3, ignoring the outside edges. Insert pieces into the bottom via the keyhole using Move 4a. During this process, it's all right if the horizontal center pieces move around.
  • When the bottom is completed, finish the top using Move 4b to get the last piece into position.

4a. To insert a piece into the bottom:

Figure 4a

Move the piece to the right hand side by rotating H (the central, horizontal slice), then rotate the right hand side, bottom, and top until it looks like Figure 4a. Now perform move 4a.

Move 4a:

H' F'f' H Ff


4b. To complete the top (fill in the keyhole):

Figure 4b 

Move 4b:

Ff H' F'f' H' 
Ff H  F'f' H


Step 5: Complete the 16 remaining crosses

Figure 5
First complete the upper cross piece of each side using H and F moves, giving the cube in Figure 5.
  • Now use Move 5a to rotate eight of the equator pieces (swapping between opposite faces) or Move 5b to rotate between adjacent pieces.
  • At times you will have the situation of having to swap only two Crosses with each other, rather than doing two swaps at the same time. Move 5c will succeed in swapping the two pieces.

5a. To exchange the location of eight of the equator pieces (Useful for symmetrically scrambled cubes):

Figure 5a 

Move 5a:

F2f2 H F2f2 H'

5b. To swap adjacent pieces (more useful for highly scrambled cubes):

Figure 5b 

Move 5b:

H  L2l2 
H' Ll H' Ll 
H' L2l2 
H  Ll H  Ll

Note: In this move, "Ll" indicates capital L and lowercase "ell"; thus "Ll" means to turn both the left hand side and the 2nd layer in from the left hand side one quarter turn.

5c. If only two pieces remain to be swapped:

Figure 5c 

Move 5c:

U'u' R'

then Move 5b then

R Uu

Step 6: Associate wings with their appropriate edge pieces

  • Use Move 6 to join wings with their appropriate edge piece. When doing this move, be sure that the wing piece at the back of the second row of the left side does not already match it's neighboring edge. If it does, place a different wing piece on the left side so as to not mess it up.
  • This process will take quite some time. After you have associated a few of the wings and edges, begin to pay attention to the movement of the piece from the back-left of the cube to the back-top of the cube, trying to align the piece with the top back edge.
  • About 50% of the time you will get a "Parity Problem", meaning that you'll have either two or four wings left to position. Move 6a will not work in this situation, since it moves three pieces. Instead, use Move 6d to fix the parity problem.
  • Moves 6b and 6c are other useful moves for orienting pieces during this process

6a. To associate two wings with their appropriate edges (on the left side):

Figure 6a 

Move 6a:

Ll   F' 
L    F 
L'l' F

Note: A very similar move performs the mirror image of Move 6a. This move can be used to associate two wings with their appropriate edges on the right side:

Figure 6a-Mirror 

Mirror of Move 6a:

R'r' F  
R'   F'
Rr   F'

6b. To move a wing from one side of the back to the other:

Figure 6b 

Move 6b:

B L' D' B2

Remember, B means the back side and D means the down side

6c. To move a wing up to position it for Move 6a:

Figure 6c 

Move 6c:

B' R' 
B  L' D' B2 
R  B

This is B' R' then Move 6b then R B

6d. To fix a Parity Error situation:

Figure 6d 

Move 6d:

Rr U2 
Rr U2 
Rr U2 
Rr U2 
Rr U2

6e. Another parity Error situation occurs when one edge (and one edge alone) has it's two wings flipped, yet the other 11 edges are all solved.

This move should fix this situation (contributed by David Bandel)

Figure 6e 

Move 6e:

Rr Rr B2 U2 Ll U2 R'r'
U2 Rr U2 F2 Rr F2 L'l'
B2 Rr Rr

Remember, B means the back side

6f. This move will flip 2 wings on the left and one wing on the right

(contributed by Miro Karosu)

Figure 6f 

Move 6f:

H F U F'
L F' L'
F H'

6g. This move will swap 1 edge on the front top with its opposite edge on the top back

(contributed by Miro Karosu)

Figure 6g 

Move 6g:

R2r2 B2
R'r' U2
R'r' U2
B2   R'r'
B2   Rr
B2   R'r'
B2   R2r2
B2   U2

Remember, B means the back side

6h. This move will swap 1 wing on the top with its opposite wing on the top

(contributed by Miro Karosu)

Figure 6h 

Move 6h:

L'l' U2
L'l' U2
F2   L'l'
F2   Rr
U2   R'r'
U2   L2l2

6i. This move will swap 2 wing/edge/wing groups and 2 corners in the top

(contributed by Phil Hughes)

Figure 6i

Move 6i:

R  U  R' U'
R' F  R2 U'  
R' U'        
R  U  R' F'

Step 7: Solve the 3x3x3

Figure 7a  Figure 7b 

Use your favorite 3x3x3 solution to solve the cube, since the edg

Rabu, 26 Agustus 2020

Konfigurasi dasar HP Procurve Switch


Sebenarnya, ada beberapa cara untuk melakukan konfigurasi Procurve switch, diantaranya melalui Web GUI interface dan Command Line Interface (CLI), baik telnet atau SSH. CLI terbagi dua cara lagi, yaitu langsung dengan command atau melalui MENU.

Cara 1 : Melalui CLI Command

Untuk melakukan konfigurasi pada mode CLI kita hasrus masuk ke mode (config) dengan perintah :

SWITCH#config

Akan muncul prompt seperti ini :

SWITCH(config)#

Beberapa contoh command penting pada Procurve :

1. Memberikan nama host untuk switch

SWITCH#config
SWITCH(config)#hostname SWITCH01

2. Memberikan IP address untuk switch

SWITCH(config)#vlan 1
SWITCH(vlan-1)#ip address 10.10.1.1 255.255.255.0
SWITCH(vlan-1)#write mem
SWITCH(vlan-1)#exit

3. Melihat konfigurasi yang sudah tersimpan

SWITCH(config)#show config

4. Setting waktu di switch

SWITCH(config)#time MM/DD[/[YY]YY] time 420
note (420 = GMT+7 –> 7 x 60 menit = +420)

5. Memberikan nama port untuk interface tertentu

Misalnya : Port A1 atau interface A1
SWITCH(config)#interface A1
SWITCH(eth-A1)#name “DHCP server”
Konfigurasi VLAN di HP Procurve switch

1. Menambah VLAN baru, misalnya VLAN 10

SWITCH(config)#vlan 10

2. Memberikan nama VLAN

SWITCH(vlan-10)#name IT-Dept

3. Memberikan IP address VLAN

SWITCH(vlan-10)#ip address 10.10.10.1 255.255.255.0

4. Menentukan DHCP Server untuk VLAN tertentu

SWITCH(vlan-10)#ip helper-address 10.10.10.2

5. Melakukan Untagged VLAN untuk port tertentu pada switch

Misalnya : Port A11-A20 pada switch akan di-untagged ke VLAN 10
SWITCH(vlan-10)#untagged A11-A20

6. Melakukan tagged VLAN untuk port tertentu pada switch

Misalnya : Port A1-A10 pada switch akan di-tagged ke VLAN 10
SWITCH(vlan-10)#tagged A1-A10

7. Menghilangkan tag & untagged VLAN tertentu

SWITCH(vlan-10)#no untagged A11-A20
SWITCH(vlan-10)#no tagged A1-A10

8. Menampilkan semua VLAN yang ada

SWITCH(config)#show vlan

9. Menghapus VLAN

Misalnya : Akan menghapus VLAN 10
SWITCH(config)#no vlan 10

10. Membuat routing antar VLAN (inter VLAN routing)

SWITCH(config)#ip routing

11. Melihat tabel routing pada switch

SWITCH(config)#show ip route
Konfigurasi Advance HP Procurve switch

1. Membuat Trunk pada switch Procurve

SWITCH(config)#trunk A41-A44 Trk1 Trunk

2. Membuat Link Aggregation (LACP) pada switch Procurve

SWITCH(config)#trunk A45-A48 Trk2 LACP

3. Setting default gateway untuk switch

SWITCH(config)#ip default-gateway 10.10.1.254

4. Membuat routing antar VLAn (intervlan routing)

SWITCH(config)#ip routing

5. Meningkatkan keamanan DHCP server dengan DHCP snooping

SWITCH(config)#dhcp-snooping
SWITCH(config)#dhcp-snooping authorized server 10.10.1.2

6. Konfigurasi DNS server untuk LAN

SWITCH(config)#ip dns server-address 10.10.1.3 priority 1
SWITCH(config)#ip dns server-address 10.10.1.4 priority 2

7. Memberikan nama domain untuk LAN

SWITCH(config)#ip dns domain-name “namadomain.com”

8. Melakukan IP routing ke network lain

Misalnya : melewatkan trafik internet bagi user yg gateway-nya ke arah interface switch melalui gateway 10.10.1.5

SWITCH(config)#ip route 0.0.0.0 0.0.0.0 10.10.1.5

9. Mengkonfigurasi Fault Detection system

SWITCH(config)#fault-finder bad-driver sensitivity high
SWITCH(config)#fault-finder bad-transceiver sensitivity high
SWITCH(config)#fault-finder bad-cable sensitivity high
SWITCH(config)#fault-finder too-long-cable sensitivity high
SWITCH(config)#fault-finder over-bandwidth sensitivity high
SWITCH(config)#fault-finder broadcast-storm sensitivity high
SWITCH(config)#fault-finder loss-of-link sensitivity high
SWITCH(config)#fault-finder duplex-mismatch-hdx sensitivity high
SWITCH(config)#fault-finder duplex-mismatch-fdx sensitivity high
SWITCH(config)#fault-finder link-flap sensitivity high

10. Menentukan STP priority

SWITCH(config)#spanning-tree Trk1 priority 4
SWITCH(config)#spanning-tree Trk2 priority 4

11. Konfigurasi SNMP

SWITCH(config)#snmp-server community “private” unrestricted
SWITCH(config)#snmp-server community “public” operator
SWITCH(config)#snmp-server host 10.10.1.10 community “private” trap-level all
SWITCH(config)#snmp-server host 10.10.1.10 community “public” trap-level all
SWITCH(config)#snmp-server contact “email” location “Rack A”

12. Melemparkan log switch ke sebuah Syslog server

SWITCH(config)#logging 10.10.1.10
SWITCH(config)#logging facility syslog
SWITCH(config)#logging severity info

Senin, 24 Agustus 2020

PANDUAN LENGKAP CARA UNINSTALL PAKET SOFTWARE DI UBUNTU

Panduan Lengkap Cara Uninstall Paket Software di Ubuntu – Anda mungkin sering menginstal aplikasi atau software di Ubuntu Anda, dan setelah mencobanya, Anda mungkin merasa software atau aplikasi tersebut tidak cocok dan Anda kemudian memutuskan untuk menghapus instalasi paket software tersebut.
Cara uninstall hapus software di ubuntu
Pada artikel ini, saya akan menunjukkan kepada Anda cara menghapus instalasi paket software menggunakan tampilan grafik yaitu di “Ubuntu Software Center” dan atau memilih untuk uninstall software paket melalui baris perintah atau command line, menggunakan perintah apt atau apt-get.
Hanya root atau pengguna dengan hak sudo yang dapat menghapus atau uninstall paket software dari Ubuntu. Baca → Cara Membuat Sudo User dan Sudo Group di Ubuntu.

Uninstall Software Paket menggunakan Ubuntu Software Center

Jika menggunakan baris perintah terasa sulit bagi Anda, Anda dapat melakukan uninstall software aplikasi melalui Ubuntu Software Center (USC). Utilitas ini menyediakan antarmuka grafis untuk menemukan, menginstal, dan menghapus aplikasi yang terinstall.
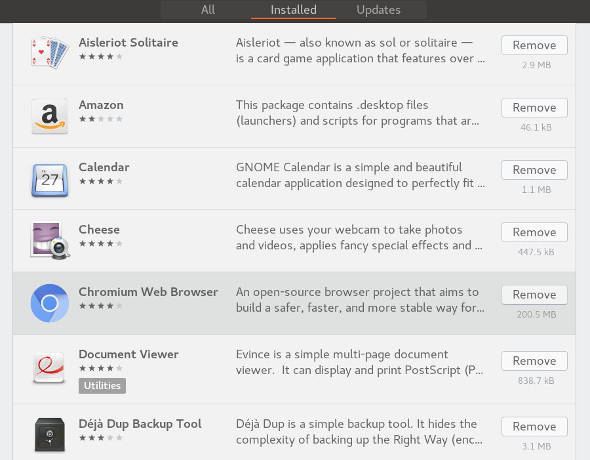
  • Silahkan masuk ke Activities, cari “Ubuntu Software” dan klik ikon USC orange. Ini akan membuka tool USC.
  • Untuk mendapatkan daftar semua aplikasi yang diinstal, klik pada tab “Installed” di bar navigasi atas.
  • Scroll ke bawah sampai Anda menemukan aplikasi yang ingin Anda hapus dan klik tombol “Remove” di sebelahnya.
cara hapus uninstall software paket ubuntu
Tools software Ubuntu hanya menampilkan aplikasi yang diinstal yang memiliki antarmuka pengguna grafis (GUI). Jika Anda tidak dapat menemukan paket yang ingin Anda hapus, maka Anda harus menghapus paket dari baris perintah.

Uninstall Software Paket menggunakan Command Line

Semua yang dapat Anda lakukan menggunakan alat GUI, dapat Anda lakukan dari baris perintah. Bahkan, baris perintah memberi Anda lebih banyak opsi dan kontrol untuk menghapus instalasi paket software.
Anda dapat membuka terminal Anda dengan menggunakan Ctrl+Alt+T keyboard shortcut atau dengan mengklik ikon terminal.
Sebelum menghapus instalasi paket software, Anda harus terlebih dahulu menemukan nama paket yang tepat dari software apa saja yang telah Anda install sebelumnya. Untuk melihat daftar semua software paket yang diinstal pada Ubuntu Anda (Cara Melihat Daftar Paket Yang Di Instal di Ubuntu), silahkan ketik perintah berikut:
$ sudo apt list --installed
Perintah ini akan mencetak daftar panjang paket yang diinstal. Mungkin ide yang bagus untuk menampilkan output menjadi lebih sedikit agar lebih mudah dibaca dan dicari mana software yang Anda cari. Atau Anda dapat menggunakan grep untuk memfilter hasil.
Di Ubuntu, Debian, dan distro Linux terkait Anda dapat menginstal, mengupdate, menghapus instalan dan mengelola paket software menggunakan utilitas command-line apt dan apt-get. Sintaks kedua perintah identik.
Untuk menghapus atau uninstall paket yang diinstal, jalankan perintah berikut:
$ sudo apt remove package_name
Ganti package_name dengan nama software paket yang ingin Anda hapus.
$ sudo apt-get remove package_name
Anda juga dapat menghapus beberapa paket software sekaligus. Nama paket harus dipisahkan oleh spasi:
$ sudo apt remove package1 package2
Perintah remove menghapus instalan paket yang diberikan, tetapi mungkin ada beberapa file paket yang masih tertinggal. Jika Anda ingin menghapus paket termasuk semua file-nya secara bersih, gunakan perintah purge daripada remove:
$ sudo apt purge package_name

Uninstall Paket Snap

Jika aplikasi yang ingin Anda hapus tidak terdaftar ketika menjalankan daftar sudo apt list --installed maka mungkin itu diinstal sebagai paket snap.
Untuk mendaftar semua paket snap yang diinstal, jalankan perintah berikut:
$ snap list
Setelah Anda tahu nama paket yang tepat, Anda dapat menghapusnya dengan mengetik:
$ sudo snap remove package_name

Uninstall Paket yang Tidak Digunakan

Setiap kali Anda menginstal paket baru yang bergantung pada paket lain, maka dependensi paket juga akan diinstal. Ketika paket dihapus, paket dependensi akan tetap tertinggal pada sistem. Paket sisa ini tidak lagi digunakan oleh hal lainnya, jadi dapat Anda hapus.
Anda dapat menghapus paket yang tidak dibutuhkan dengan:
$ sudo apt autoremove

Kesimpulan

Saya telah menunjukkan kepada Anda cara menghapus atau uninstall software aplikasi dari Ubuntu Anda melalui baris perintah (Command line) dan menggunakan Ubuntu Software Center. Mengetahui cara menghapus paket adalah bagian penting dari administrasi sistem Linux.
Ada beberapa alasan mengapa Anda ingin menghapus paket yang sebelumnya diinstal dari Ubuntu Anda. Misalnya, Anda mungkin perlu menghapus aplikasi yang tidak lagi Anda perlukan atau untuk melonggarkan ruang disk Anda yang mungkin penuh dan juga bisa karena ingin membuat Ubuntu Anda berjalan lebih cepat.