How to configure static IP address on Ubuntu 18.04 Bionic Beaver Linux
Objective
The objective is to configure static IP address on Ubuntu 18.04 Bionic Beaver LinuxOperating System and Software Versions
- Operating System: - Ubuntu 18.04 Bionic Beaver Linux
Requirements
Privileged access to Ubuntu 18.04 system will be required.Conventions
- # - requires given linux commands to be executed with root privileges either directly as a root user or by use of
sudocommand - $ - requires given linux commands to be executed as a regular non-privileged user
Other Versions of this Tutorial
Ubuntu 20.04 (Focal Fossa)Instructions
Configure static IP address using DHCP
Most likely your current Ubuntu system uses DHCP server to configure its networking settings. Hence, the configuration of your IP address is dynamic. In many scenarios, simply configuring your router or local DHCP server is a preferred way to set a static address to any host regardless of the operating system in use. Check your router manual and assign the static IP address to your host based on its MAC address using the DHCP service.Configure static IP address using Netplan
Netplan network configuration had been first introduced to Ubuntu 18.04 LTS Bionic Beaver. It is available to all new Ubuntu 18.04 installations.Depending on your Ubuntu installation Netplan may not be avaiable on upgraded Ubuntu systems. If this is your case you might attempt to configure a static IP address for your network interface using
/etc/network/interfaces file as described at the end of this document.Ubuntu Server
To configure a static IP address on your Ubuntu 18.04 server you need to modify a relevant netplan network configuration file within/etc/netplan/ directory.For example you might find there a default netplan configuration file called
01-netcfg.yaml or 50-cloud-init.yaml with a following content instructing the networkd deamon to configure your network interface via DHCP:# This file describes the network interfaces available on your system
# For more information, see netplan(5).
network:
version: 2
renderer: networkd
ethernets:
enp0s3:
dhcp4: yes
enp0s3 to static IP address 192.168.1.222 with gateway 192.168.1.1 and DNS server as 8.8.8.8 and 8.8.4.4 replace the above configuration with the one below.
WARNING:
You must adhere to a correct code indent for each line of the block. In other words the prefix number of spaces for each line is important. Othersiwe you may end up with an error message similar to: Invalid YAML at //etc/netplan/01-netcfg.yaml line 7 column 6: did not find expected key
You must adhere to a correct code indent for each line of the block. In other words the prefix number of spaces for each line is important. Othersiwe you may end up with an error message similar to: Invalid YAML at //etc/netplan/01-netcfg.yaml line 7 column 6: did not find expected key
# This file describes the network interfaces available on your system
# For more information, see netplan(5).
network:
  version: 2
  renderer: networkd
  ethernets:
    enp0s3:
     dhcp4: no
     addresses: [192.168.1.222/24]
     gateway4: 192.168.1.1
     nameservers:
       addresses: [8.8.8.8,8.8.4.4]
$ sudo netplan applyIn case you run into some issues execute:
$ sudo netplan --debug apply
Ubuntu Desktop
This is a preferred way of setting the static IP address on Ubuntu Desktop.
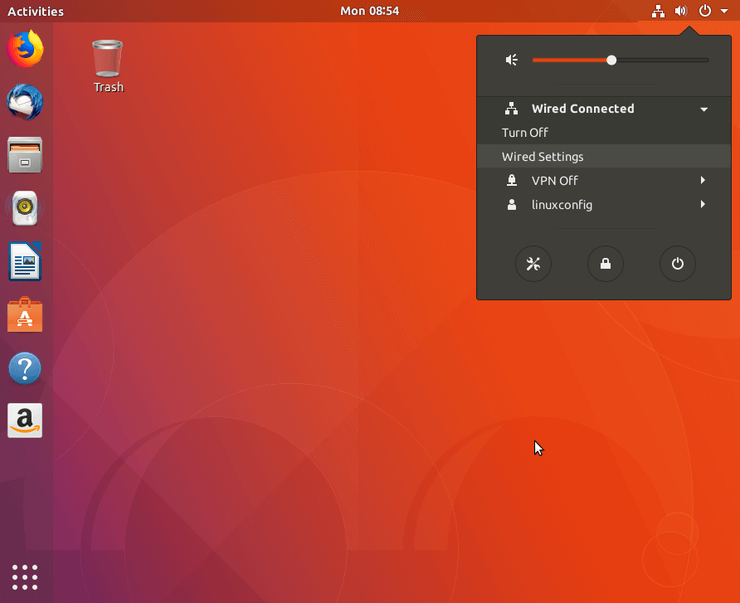
Click on top right network icon and select settings corresponding to the network interface you wish to assign with the static IP address.

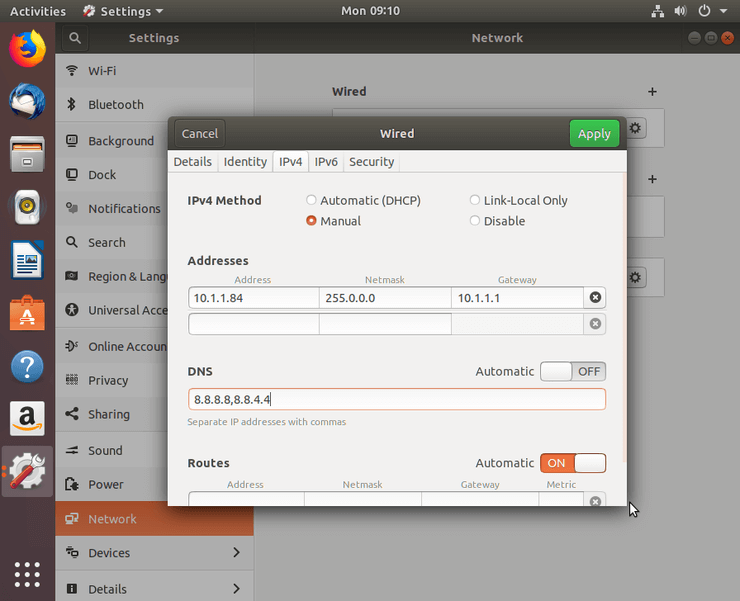
Next, click on the gear box icon next to your network connection you wish to configure. This could be wired or wireless connection.

Select IPv4 from the top menu.

Apply
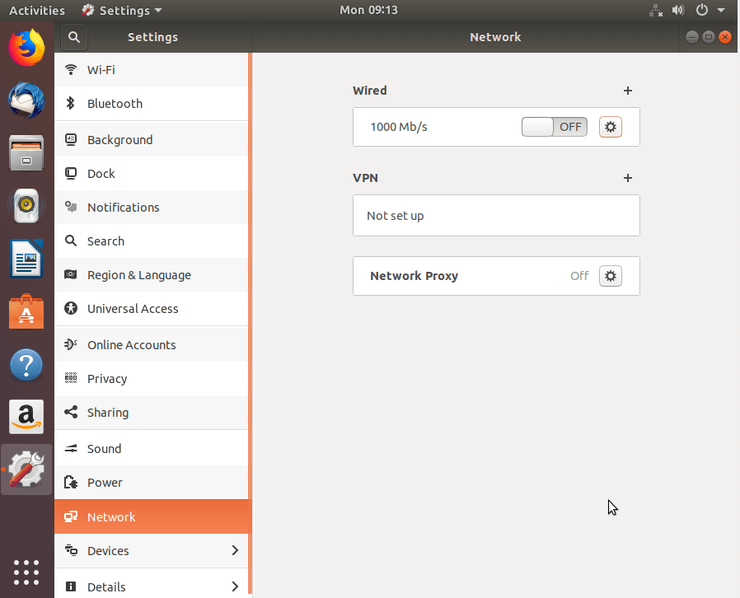
Restart your network by ON/OFF switch.

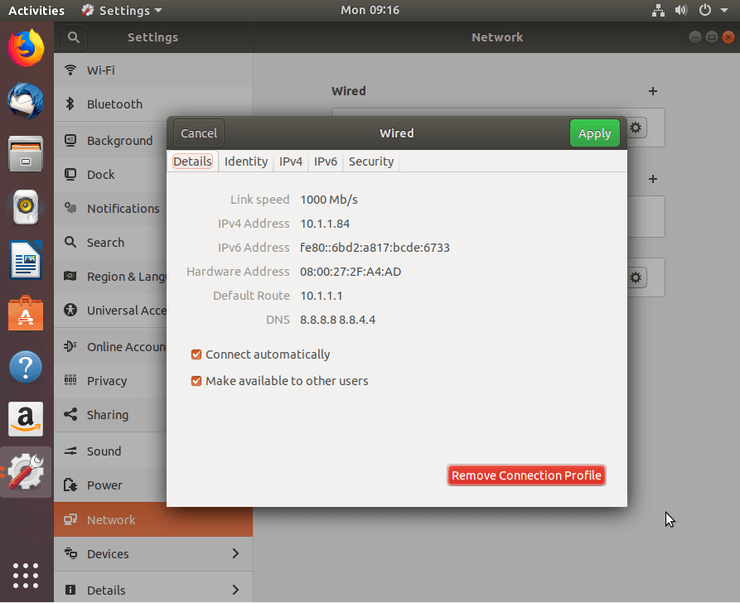
Check your new static IP address configuration.
Configure static IP address using interfaces file
The following procedure is mostly obsolete on Ubuntu 18.04 systems with Netplan preinstall. However, some upgraded Ubuntu 18.04 may still need to use the/etc/network/interfaces file to configure the static IP address on Ubuntu Server or Desktop systems. The content of /etc/network/interfaces file most likely currently contains the following lines:# interfaces(5) file used by ifup(8) and ifdown(8) auto lo iface lo inet loopbackTo configure the static IP address we first need to know the network interface name which we need to assign with the static IP address. Use any of the bellow commands to list all network interface names available:
$ ip a OR $ ip link show 1: lo:mtu 65536 qdisc noqueue state UNKNOWN mode DEFAULT group default qlen 1000 link/loopback 00:00:00:00:00:00 brd 00:00:00:00:00:00 2: enp0s3: mtu 1500 qdisc fq_codel state UP mode DEFAULT group default qlen 1000 link/ether 08:00:27:2f:a4:ad brd ff:ff:ff:ff:ff:ff
Subscribe to Linux Career NEWSLETTER and receive latest Linux news, jobs, career advice and tutorials.
enp0s3. Use your favorite command line text editor to change the following content into your existing /etc/network/interfaces file while replacing the example configuration settings with settings to fit your needs:auto enp0s3
iface enp0s3 inet static
address 10.1.1.83
netmask 255.0.0.0
gateway 10.1.1.1
dns-nameservers 8.8.8.8 8.8.4.4
enp0s3 network interface. On Line 4 we configure network mask and Line 5 is used to set a gateway IP address. Optionally, on Line 6 we can set multiple IP addresses of preferred DNS servers. Here is the resulting example /etc/network/interfaces file:$ sudo nano /etc/network/interfaces

Save the
/etc/network/interfaces file and either reboot your system or restart network using the following linux commands to apply new settings:$ sudo ip a flush enp0s3 $ sudo systemctl restart networking.serviceCheck your IP address configuration to confirm correctness of your new configuration settings
.
Tidak ada komentar:
Posting Komentar